
Back to: Cricut & Etsy
CALIBRATION:
Before we move on to Print Then Cut we have to calibrate our Cricut machine.
Print Then Cut calibration ensures your machine cuts precisely along the edge of your printed images. Select your platform below for step-by-step instructions.
- 1.Sign in to Design Space and go to the menu to select Settings.
- 2. Go to Machines > Machine Calibration > Select Cricut device.
- 3. Once you’ve selected your machine, click Start. Depending on which machine you have connected, you will be asked which calibration you want to complete. Choose Print Then Cut.
- 4. Choose which printer you’d like to use to print your calibration sheet. Once printed, select Continue.
- 5. Place the printed calibration sheet onto your machine mat, positioning it as shown on the screen (for Cricut Venture, align to bottom left corner of mat, for all other smart cutting machines, align to top left corner of the mat). Select Continue.
- 6. Ensure that your Cricut machine is powered ON and connected to your computer via USB cable or Bluetooth pairing. On the next screen, select your machine from the drop-down menu, load the mat into your machine, and press Go.
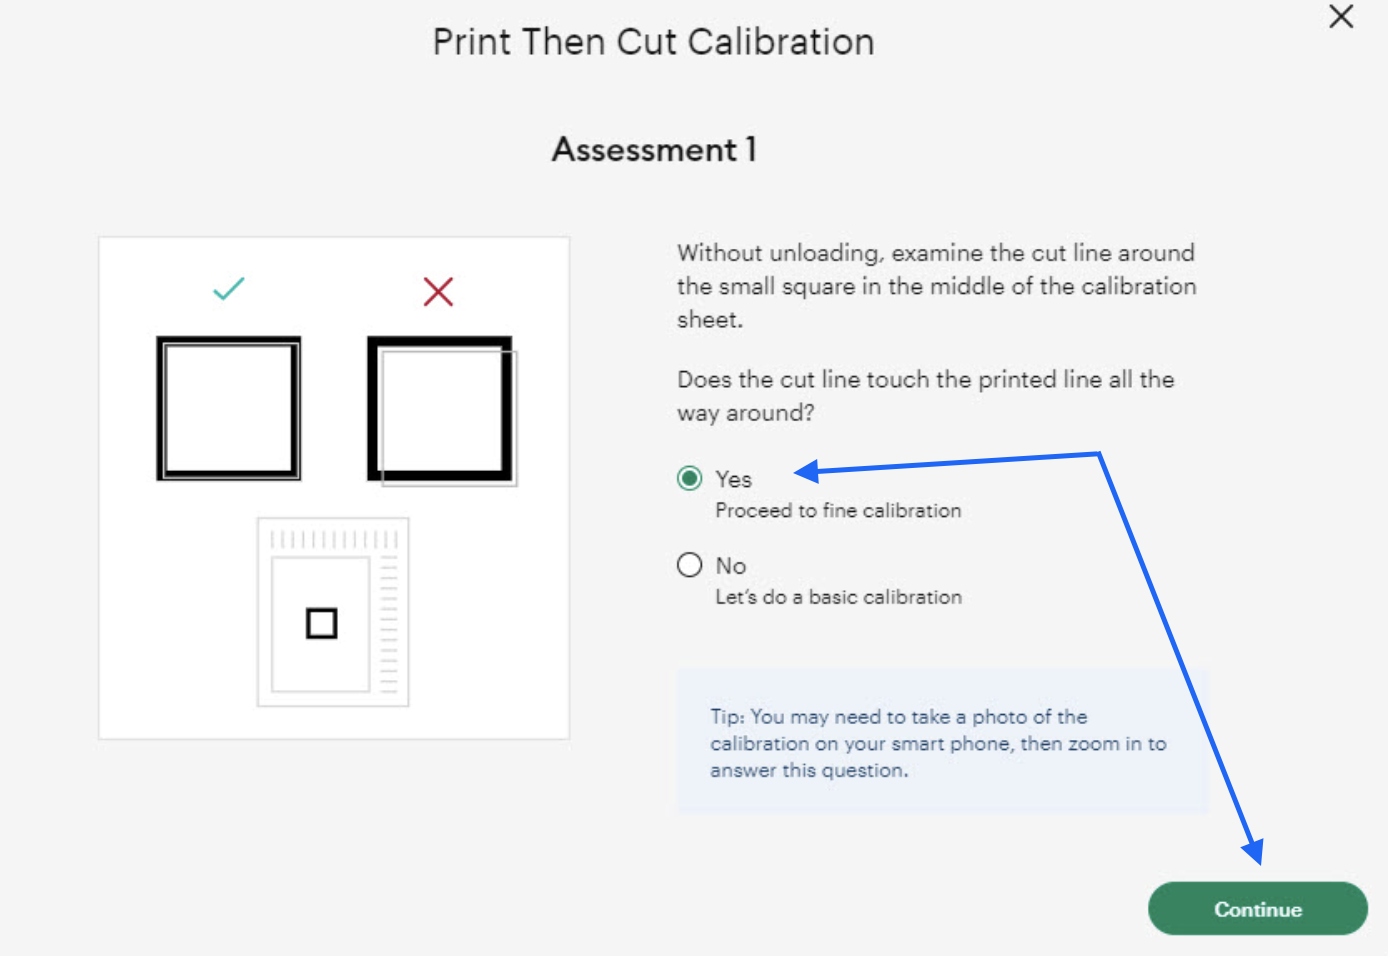
- 7. Your machine will begin to scan the sheet for calibration markings. Once done it will cut around the small square near the center of the sheet. Without unloading the mat, look at the cut to see if the cut touches the printed line all the way around. If it does, select Yes in Design Space, then Continue to proceed to the next step.
- Note: If you select No, Design Space will proceed to the next step in an effort to get the cut closer to the line. Once that is complete, you will be guided through the calibration once more to fine-tune it.
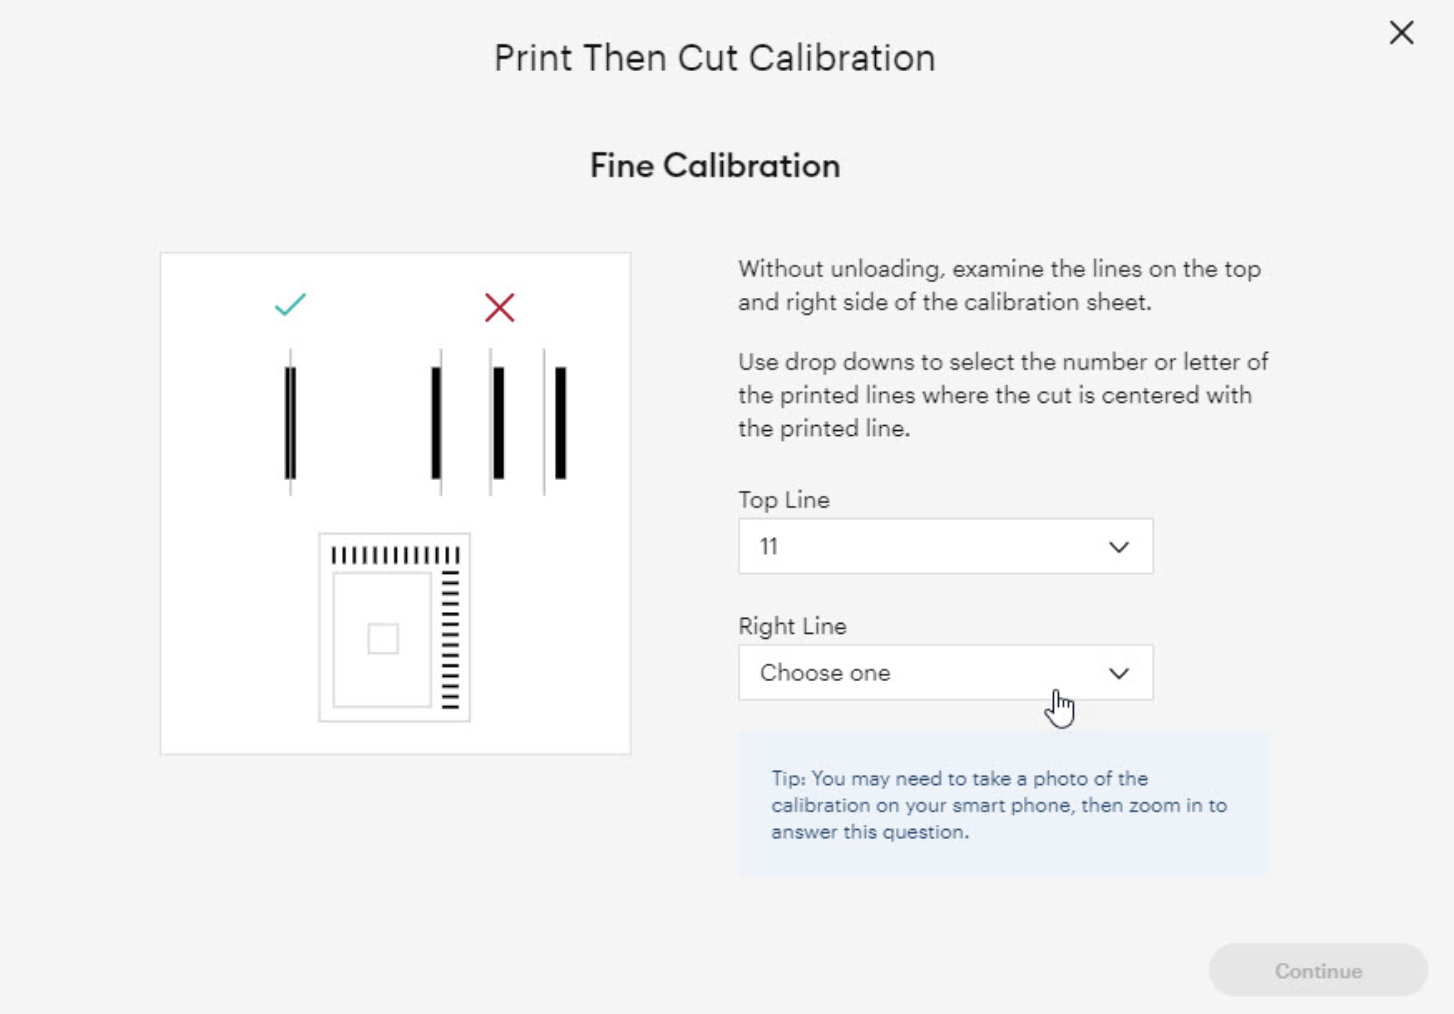
- 8. The machine will begin the calibration cuts along the top and side of the page. Once done, and without unloading the mat, look closely at the lines along the top and side of the page. Some will not touch the printed lines, and others will. Design Space will ask you to select which number and letter cuts are closest to the center of the printed lines. Select the Top then Right dropdowns to indicate the line number or letter with cuts closest to the center of the line. When you are done, select Continue.
- 9. The machine will then perform a confirmation cut around the large rectangle on the sheet. When it is done, unload the mat, remove the calibration sheet and respond to the final question in Design Space.
- If you are happy with the cut, select Yes, cut is close enough to the center and the calibration is now complete!
- If you select No, I’d like to do another calibration, you will be guided through the calibration process again to refine it.
- Note: Depending on your current offset, you may find more than one calibration is needed. Choose to refine the calibration as needed until you are satisfied with the cut results.
PRINT THEN CUT
Print Then Cut allows you to create a design in Design Space, print it on your home printer, then load the print into your Cricut Explore or Cricut Maker machine for cutting. The machine scans the printed cut sensor markings, then cuts your design with precision – no scissors required! This allows you to create stickers, toppers, and even cut photos with ease!
IMPORTANT WORDS TO KNOW!
| WORD | DEFINITION |
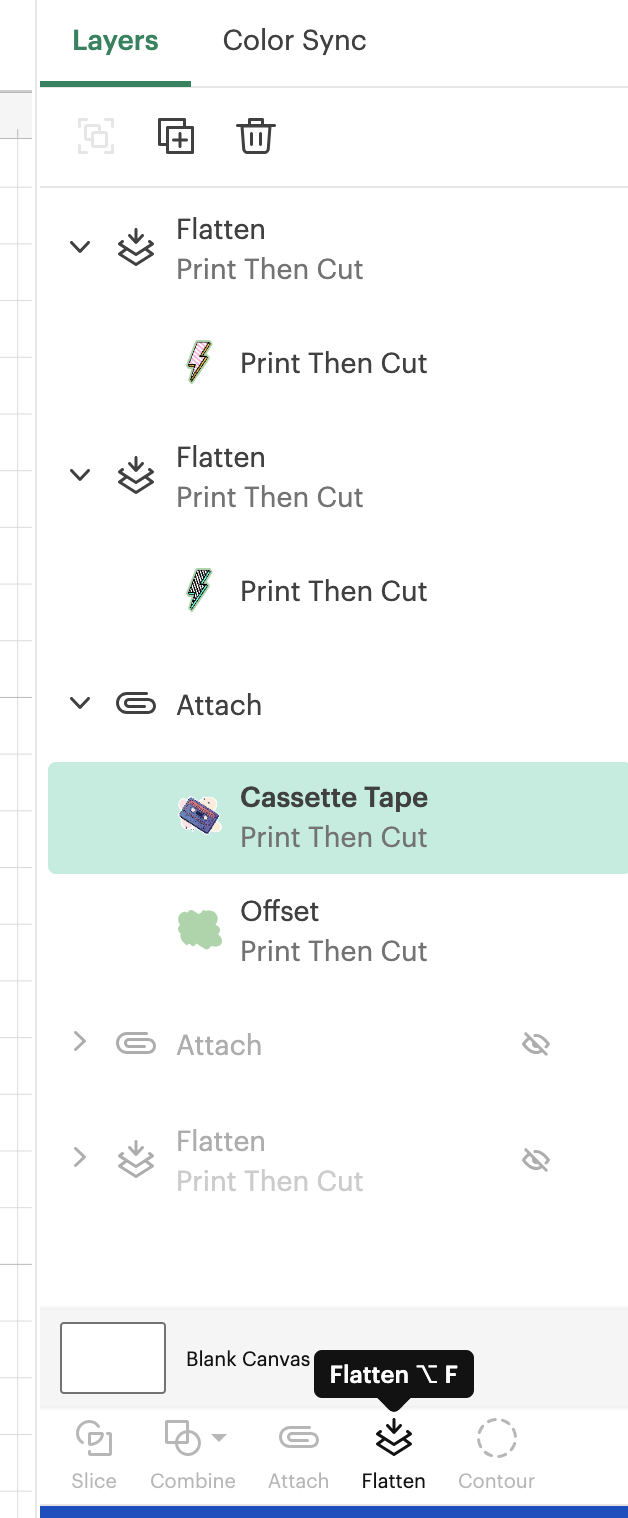
Flatten: | This feature is your friend for turning multi-layer designs into a single printable layer. Your machine will cut just the outer shape of your flattened objects. Whether you’re stacking layers on top of one another or arranging multiple objects on a page and need to lock their position, when it’s for Print Then Cut, use Flatten. |
Bleed: | Bleed is a small border of color added around each image that allows for more precise cutting. Although we recommend printing with a bleed for best cut results, you do have the option to turn the bleed on or off on the print setup. The bleed may look fuzzy or distorted, but this border will be trimmed off in the cutting process, yielding a precisely cut image with color all the way to the edge. |
Offset: | Offset creates a proportionally larger or smaller layer of your design, great for making custom stickers, cake toppers, and t-shirt designs. Offset layers add a “shadow” or decorative outline to your design. |
Kiss-Cut: | A kiss-cut sticker is a type of custom sticker that’s cut to a specific shape, leaving a paper backing that holds the design in place. |
Die-Cut | A die-cut cuts around your design all the way through both the sticker material and liner. |
Compatible Cricut Smart Cutting Machines
- Cricut Joy Xtra
- Cricut Explore machines
- Cricut Maker machines
- Cricut Venture machines
Choose a home printer that is capable of printing in color. While we don’t recommend a particular make or model, here are some tips for choosing a printer that will work for you:
Inkjet (Recommended)
- Uses ink cartridges and small nozzles to spray fine ink droplets onto the material
- Best printer type for a wide variety of printable materials including printable vinyl, printable iron-on, sticker paper, etc.
Laser
- Uses high heat to fuse toner to the material
- Not for use with heat-sensitive materials such as printable vinyl or printable iron-on
- Works very well for regular printer paper, some weights of cardstock, and specialty materials specifically manufactured for use with laser printers to withstand the high heat.
PRINTING MATERIALS:
For Print Then Cut, materials should be non-reflective or have a matte finish. Reflective materials – such as those with a metallic, glitter, or glossy finish – will interfere with the Print Then Cut sensor in the Cricut machine, causing it to not be able to read the cut sensor markings.
- Cricut Explore Air 2 and older machines: print on non-reflective white materials only
Cricut Venture, Cricut Joy Xtra, Cricut Explore 3, Cricut Maker 3, and Cricut Maker machines: print on non-reflective white, lightly colored, and simple patterned materials.
DESIGN:
Uploading:
- Design Space allows you to upload images your own designs, find on the internet* or purchase from other designers, and save them as Print Then Cut images.
Important:* respect the intellectual property rights of others and only upload images you own or are authorized to use.
MAKE A DESIGN PRINTABLE
You can convert any single cut image into a printable image by changing the Operation type to Print Then Cut in the Edit bar. On mobile, select Edit > Operation > Print Then Cut. To convert a multi-layer design into a single printable layer, use the Flatten tool.
- Make
If you like the layout click >Continue to send your design to the printer.
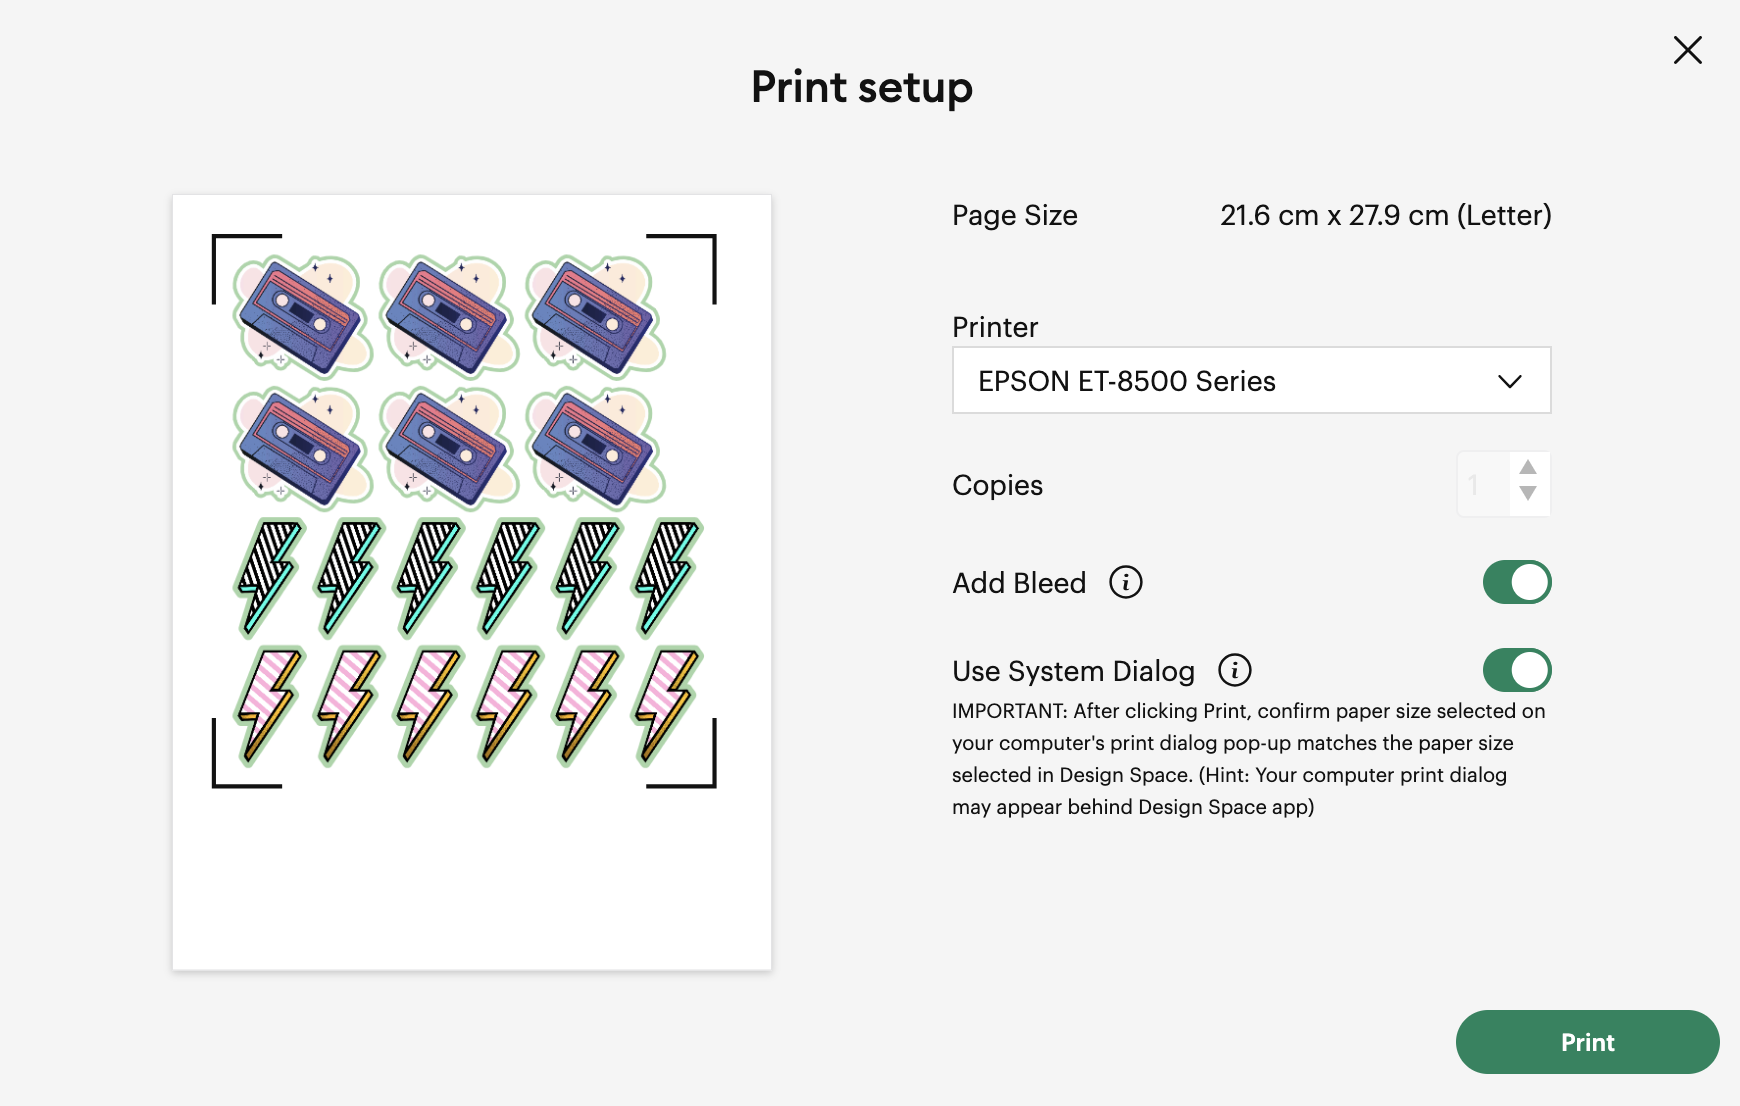
In this menu, you can control the number of copies you wish to print.
Add Bleed.
Use the system dialog; you have control over the quality of your print but more importantly the type of paper you are printing on.
SYSTEM DIALOG:
Media Type:
Premium Presentation Paper Matte. Note that every printer presets will be different but look for matte paper presets if your sticker paper is matte. If you used glossy select a glossy preset.
Print Quality:
Best or the Highest.
STICKERS & THEIR CRICUT SETTINGS:
You have printed your design out, now it’s time to cut it out.
STICKERS
Apply an overlay. Overlay is to waterproof the stickers. However Cricut has a hard reading reflective material. To work around this place scotch tape over the black registration marks. Then draw over them with a black sharpie.
Place on the green mat.
Back in Design Space click >I already printed>
Pick your material.
I recommend the Premium Vinyl setting as the best setting for most sticker papers when you want to make kiss-cut sticker sheets. But if you’re still having trouble with your Cricut cutting through your sticker paper (or NOT cutting enough), try changing your material setting to Sticky Note, or Washi Tape. For intricate cuts try the Washi Tape material setting.
Note: The Cricut Sticker Paper setting will NOT work well for most stickers because it is calibrated for the Cricut brand sticker paper which is cardstock weight.
Load the mat as usual and let Cricut cut the design out. Once the cut is done, unload the mat. Then remove your stickers.
DTV
WHAT IS IT?
DTV (direct to vinyl) is printable vinyl that can be printed with any color inkjet printer to customize
on different types of fabrics in either dark or light colors.
If you’re using Siser Easycolor DTV you will print your design out using any inkjet printer.
Before clicking the “Make” button make sure to tell Cricut that it is a Print Then Cut. Send your design to the printer following the previous steps. In the system dialogue, EasyColor DTV recommends using plain paper as your paper type. Click okay and print your design.
When you look at Siser EasyColor DTV, it has a white side and a grayish side. You want to print on the white side.
CUTTING:
Place the design on either the Blue or Green Cricut mat.
Siser recommends you cut this product on the vinyl setting with more pressure. If you’re using an Explore Air 2, use the vinyl plus setting on the dial. With any Cricut machine, you can choose the vinyl setting in Design Space and then select more pressure.
